Pork Chops with Apples and Onions over Mashed Potatoes

Pork Chops with Apples and Onions

I made these pork chops for dinner a couple nights ago and I can’t wait to make them again! As far as meat goes, I usually just stick to chicken since it’s much leaner than red meats. However, when I saw this recipe for pork chops with apples and onions on Accounting for Taste, I had to try it out. I just love pork with apples and I love cooking new things! It also counts as another recipe toward my March goal of trying 4 new recipes!

Pork Chops with Apples and Onions over Mashed Potatoes

This recipe ended up being much easier than I thought it would be and it will definitely have to get added to the rotation. I decided to serve it over mashed potatoes, which are also very easy, to make it a nice filling weeknight dinner. I tried it out on the weekend because I was expecting it to take much longer but it was very simple and definitely doable for a weeknight.

Pork Chops with Apples and Onions over Mashed Potatoes

Pork Chops with Apples and Onions Over Mashed Potatoes

Serves 2

  • 2 pork chops
  • 2 1/2 teaspoons olive oil
  • 1 1/2 cups frozen pearl onions, thawed
  • 2 cups Gala apples, diced (about 2 apples)
  • 1 Tbsp butter
  • 1/2 tsp kosher salt
  • 1/2 tsp ground black pepper
  • 1/2 cup chicken broth
  • 1/2 tsp flour
  • 1 tsp apple cider vinegar
  • 4 red potatoes
  • 1/2 cup sour cream
  • 2 oz cream cheese (optional)
  • 1/4 cup milk
  1. Add potatoes to a large pot and fill with enough water to cover potatoes
  2. Bring to a boil and cook until fork tender, about 30 minutes
  3. While potatoes are cooking, preheat oven to 400° F
  4. In oven proof skillet, heat 1 tsp olive oil over medium-high heat
  5. Saute pearl onions a couple minutes, until slightly browned
  6. Add apples, 2 tsp butter, 1/4 tsp salt, and 1/4 tsp pepper to pan and place in oven for about 10 minutes, until apples are tender
  7. Heat remaining olive oil in another large pan over medium-high heat
  8. Use remaining salt and pepper to season pork and cook in pan, about 3-5 minutes each side, until cooked through
  9. Remove pork from pan and cover with foil. Let rest for 10 minutes.
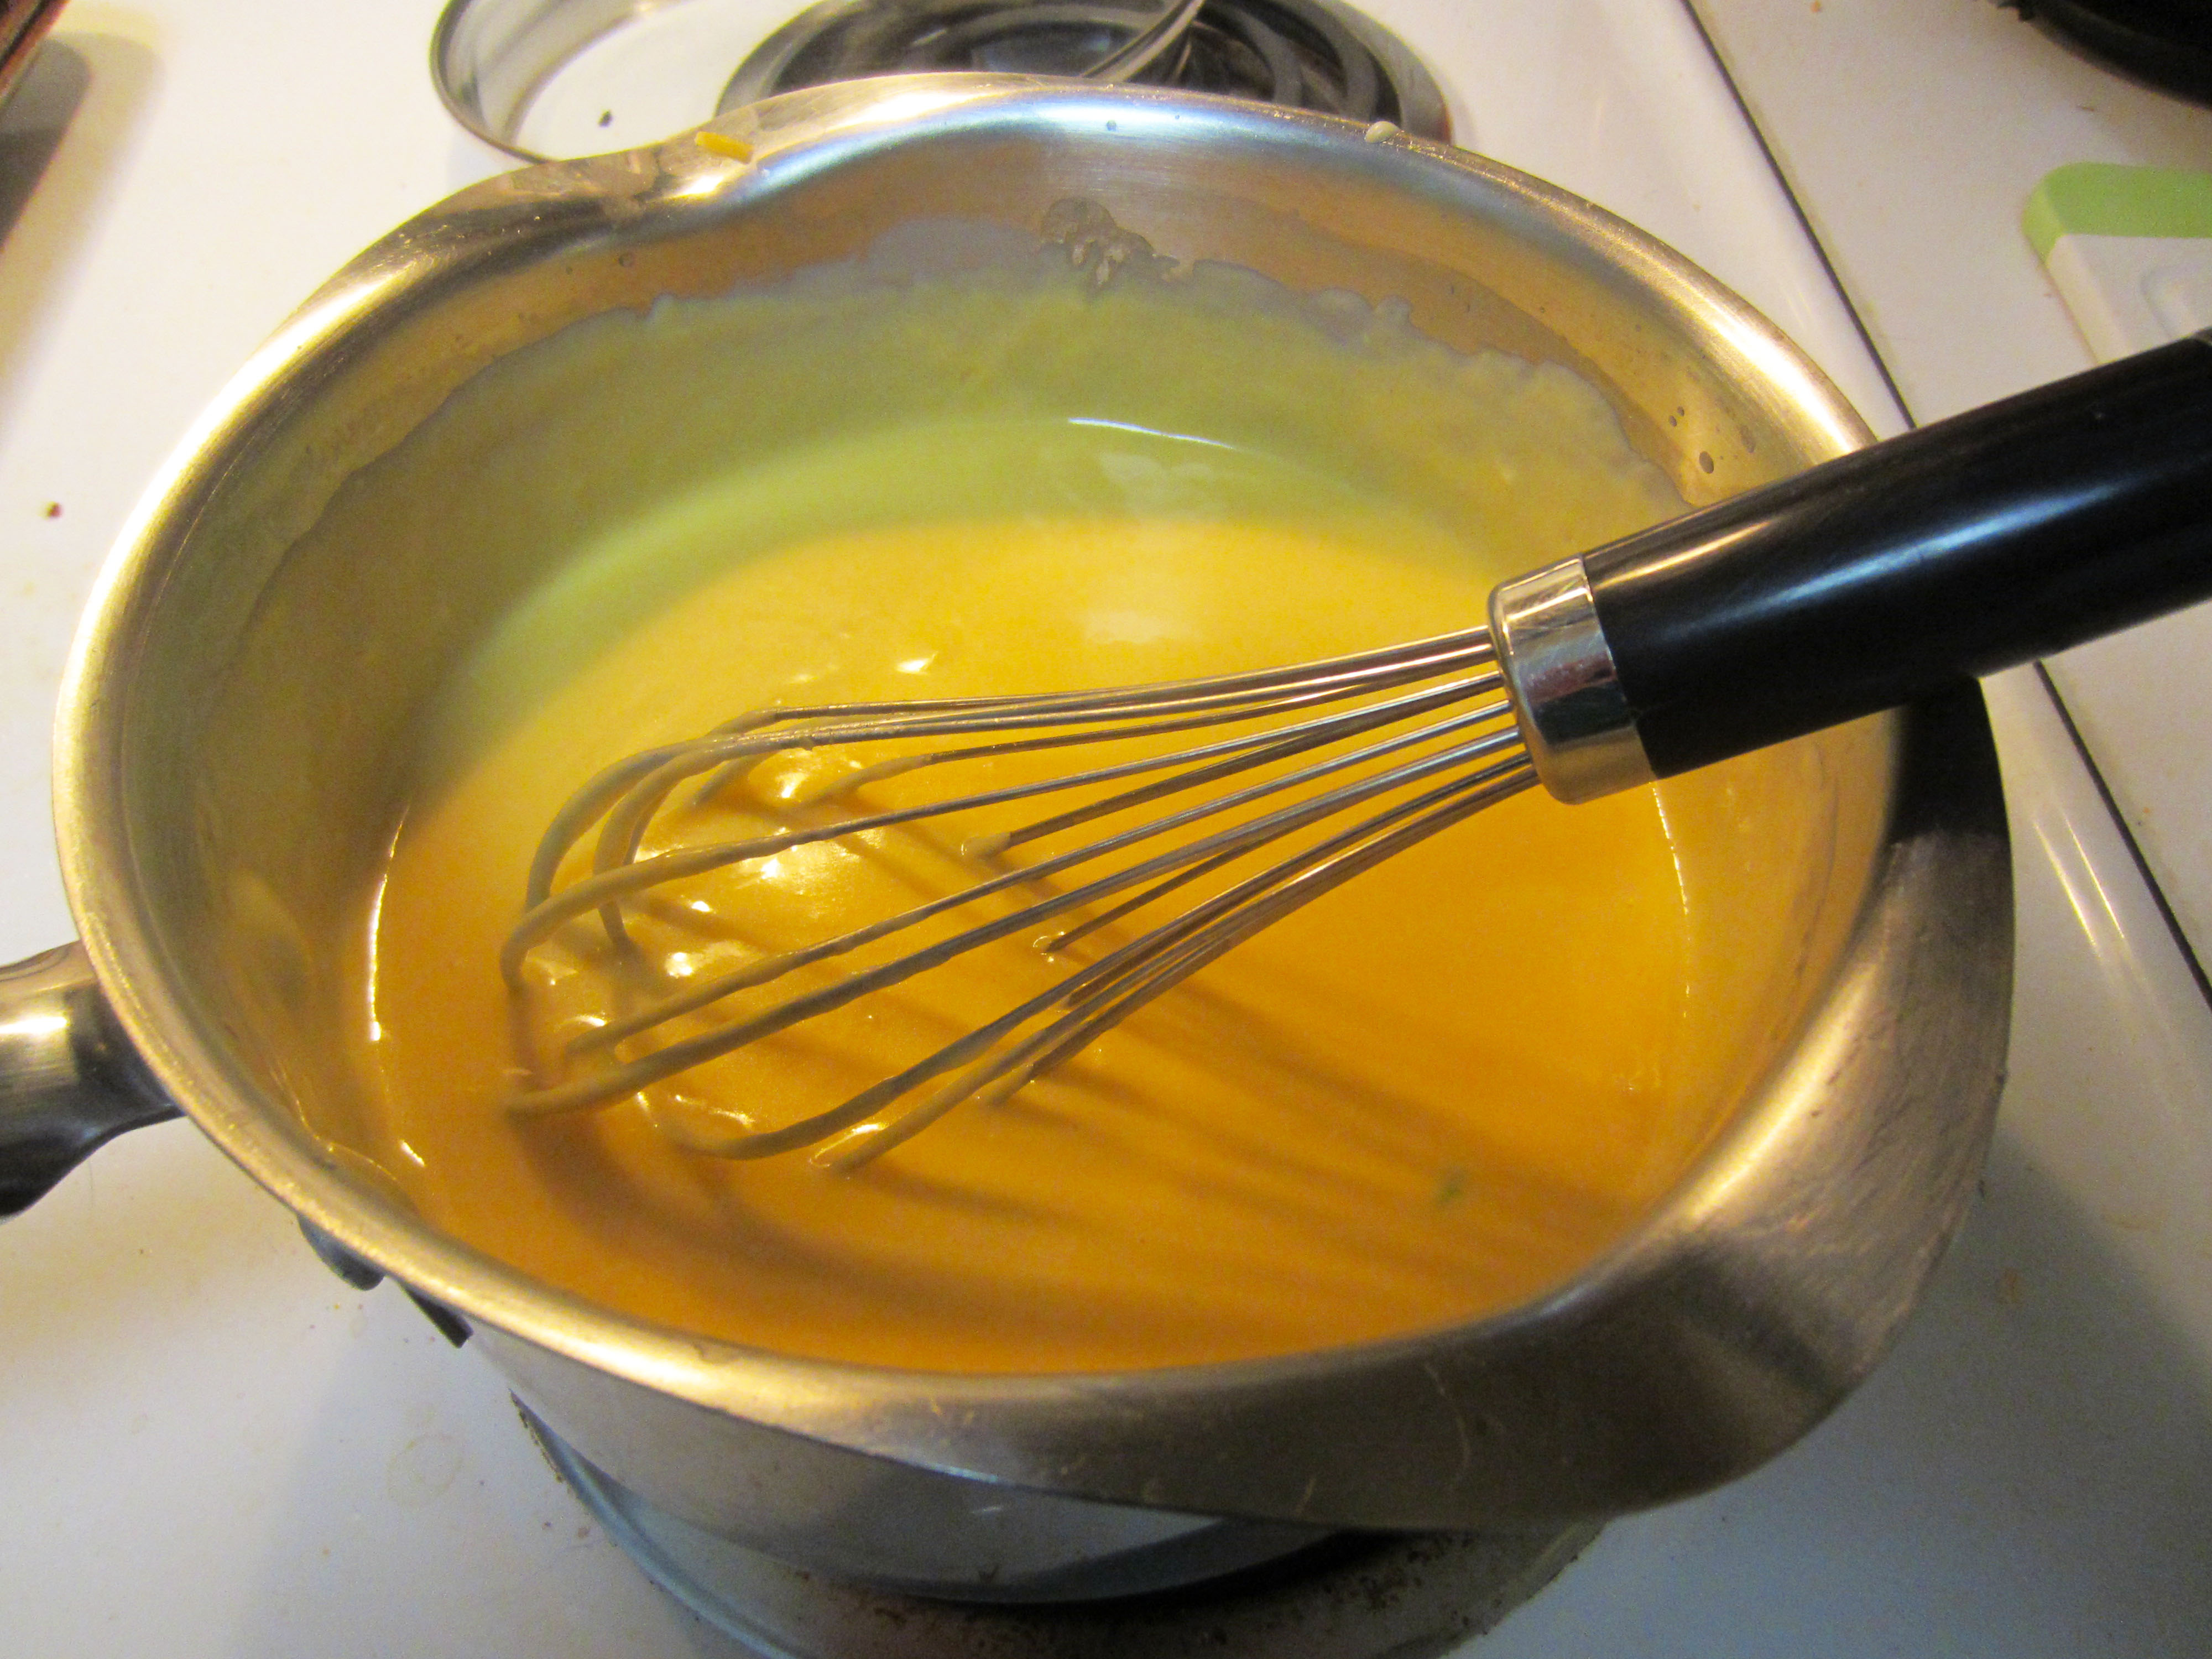
  10. In pan pork was cooked in, add chicken broth and flour and bring to a boil
  11. Whisk continuously for 1 minute, until reduced by about 1/2, making sure to scrape brown bits from bottom of pan
  12. Add cider vinegar and remaining butter to pan and remove from heat
  13. Drain water from potatoes and mash
  14. Add sour cream, cream cheese, and milk
  15. If potatoes are dry, add more milk until desired consistency is reached
  16. Serve apples, onions, and sauce on pork. Serve mashed potatoes on side or under pork.

Enjoy :)

St Patty’s Day Corned Beef and Cabbage

Though we are not Irish, growing up my family always had corned beef and cabbage the Sunday closest to St. Patrick’s Day. My dad used to be an executive chef so we often had tons of different foods, especially on Sundays when my Granny would come for dinner. I haven’t been home for St. Patrick’s Day since I went to undergrad (can’t believe it’s been 6 years already since I left home!) so I haven’t celebrated with corned beef and cabbage in quite a while. Chris had never had corned beef and cabbage before so this year, we decided to have people over for dinner so we could have the traditional Irish American dish.

I didn’t get too many pictures because everyone was too eager to dig in! We also had Guinness chocolate cupcakes with Bailey’s cream cheese frosting, but those were gone too quickly for any pictures. However, I used the Guinness chocolate cupcake recipe from MingMakesCupcakes and the Bailey’s cream cheese frosting recipe from Skinny Taste and they were both fantastic!

Corned Beef and Cabbage | Puppies in the Kitchen

Corned Beef and Cabbage with Potatoes and Carrots (my dad’s recipe)

Serves 4

Make sure to read everything before you start – everything cooks simultaneously but they start at different times so I’ve put them separately

  • Corned beef with spice packet (typically sold at 3 to 4 pounds)
  • 1 head of cabbage
  • 5 red potatoes
  • 1 bag baby carrots
  • 24 oz chicken broth
  • 1 cup sour cream
  • 1 Tbsp horseradish

Corned beef

  1. Place corned beef in a soup pot and fill with enough cold water to submerge beef and add in spice packet
  2. Bring to a boil then lower to a simmer
  3. When white foam appears at the top of the water, skim it out with a spoon
  4. Simmer for 2-4 hours depending on the size of your corned beef (cook until you can easily put in a fork and take it out)
  5. Remove beef from water and let rest for 20 minutes before slicing and serving
  6. If your beef is done before your vegetables, cover with foil and place in warm oven to keep warm

Cabbage

  1. About an hour before beef is done (don’t worry about being too accurate with this – everything can always be kept warm), remove tough outer leaves and slice cabbage into 8ths, being sure to keep core intact on each slice to prevent cabbage from falling apart
  2. Place cabbage wedges in 9 x 13 casserole dish and add chicken broth
  3. Add enough water to cover at least three quarters of the height of the wedges
  4. Cover with foil and place in 350° F oven for 45-60 minutes, until cabbage is soft but not mushy
  5. Can be kept in a warm oven until everything is finished

Potatoes and Carrots

  1. These can be added to the pot with corned beef for about the last 30 minutes of cooking or when the beef is taken out to rest or be boiled in their own fresh water for about 30 minutes or until fork tender
  2. Slice potatoes into quarters before serving

Serve everything together with horseradish sauce (mix sour cream and horseradish) on the side.


Butterless Creamy Vegetable Mac and Cheese

This is my second post for new recipes in March. You can see my goals for March here, which include trying out four new recipes. Keep a look out for some St. Patty’s recipes on Sunday! :)

Macaroni and Cheese filled with veggies - no butter! | Puppies in the Kitchen

Last night I made this creamy mac and cheese. Mac and cheese is a staple in our house and every once in a while, I try to make it a little healthier by adding some veggies so the veggie part wasn’t new to me. However, when I saw this recipe for mac and cheese without butter, I had to check it out. The cheese in the dish already contributes enough fat and instead of using butter, I love that this recipe uses olive oil to cut down on cholesterol and saturated fats.

With butter, this recipe would have 391 calories with 13 g saturated fat and 61 mg cholesterol (if divided into 6 servings). Olive oil is still very fatty, but it has healthier fats and less saturated fat. With olive oil in place of butter, the calories remain about the same (395) but the saturated fat drops to 9.3 g and the cholesterol drops to 41 mg. Macaroni and cheese certainly is not the healthiest dish and we don’t have it too often but it is nice to indulge now and again. I do love that I can feel a little better though replacing the butter with olive oil. Last night, I added some cut up chicken breast to this and we had it as our meal, rather than a side. I unfortunately did not have broccoli, which is a favorite with mac and cheese, so we had to do without but this dish was still amazing.

Butterless Creamy Veggie Mac and Cheese | Puppies in the Kitchen

Butterless Creamy Veggie Mac and Cheese

Serves 2-3 as main dish or 6-8 as side dish

  • 1 cup broccoli, cut into small chunks
  • 1 yellow bell pepper, diced
  • 1 yellow squash, diced
  • 10-15 baby carrots, sliced thinly
  • 2 cups whole wheat pasta (we like elbows or rotini)
  • 1/4 cup olive oil
  • 3 cloves garlic
  • 3 Tbsp flour
  • 1 1/2 cups skim milk
  • 2 cups cheddar cheese
  • optional: 2 cups cooked chicken breast, cubed; 1 tsp red pepper flakes; 1/2 tsp cayenne pepper

Butterless Creamy Veggie Mac and Cheese | Puppies in the Kitchen

  1. Preheat oven to 400° F
  2. Line a cookie sheet with aluminum foil or spray with cooking spray and spread out vegetables
  3. Place vegetables in oven and cook for 15 minutes
  4. Bring water to a boil and cook pasta according to package directions
  5. In another saucepan, heat oil on medium heat and saute garlic for about 2 minutes
  6. Add flour to oil and garlic, stirring constantly for 1 minute
  7. Add milk slowly, whisking constantly, and let thicken for about 5 minutes
  8. When milk sauce has gotten thick, add cheese and spices (if using) and stir until melted. Remove from heat
  9. After veggies have been cooking for 15 minutes, add chicken (if using) to tray and return to oven for another 5 minutes (otherwise just leave veggies in for 20 minutes)
  10. Add cooked pasta, veggies, and cheese sauce to a casserole dish and mix together
  11. Top with breadcrumbs and put under broiler for about 2 minutes
  12. Serve immediately

Baked Salmon with Parmesan Asparagus

The first recipe I want to share is not a new one to me, but one of my tried and true favorites. We absolutely love this salmon and asparagus dish and try to eat it once a week because of how healthy salmon is and because it’s one of Chris’s favorites. I also love it because it only dirties one pan (which doesn’t really get dirty since I line it with aluminum foil).

Health Benefits of Salmon:

  • Salmon is very high in Omega-3 fatty acids, particularly DHA and EPA. Omega-3’s are extremely important, especially in brain and heart health. Wild caught salmon typically has higher levels of Omega-3’s, but farmed salmon still has substantial levels. The other form of Omega-3’s, ALA, can be turned into EPA and DHA Omega-3’s by the body but the process is very inefficient so getting them from our diet is very important. Most other foods that are high in Omega-3’s (like walnuts and flaxseeds) are high in ALA so salmon and other fatty fish should also be added to the diet.
  • Salmon is high in protein. While it is not as lean as chicken breasts, the fat in salmon comes in the form of very important Omega-3’s, making it attractive for those trying to build muscle or lose weight.
  • Salmon is high in Vitamin D. Women in particular tend to have low levels of vitamin D but in the winter, we’re all probably lacking due to the decrease in sunlight. Vitamin D is important in bone health and deficiency has been linked to depression.

While there have been some reports of contaminants in farm raised salmon, the health benefits of eating salmon far outweigh the risks.

Now on to the recipe :)

How yummy does that look??

How yummy does that
look??

I love this recipe for a weeknight because it’s extremely simple. When I first moved out on my own and started cooking, I was afraid of cooking salmon because it’s not something I ate much growing up and I thought it would be much more complicated than it is. After playing around with cooking times and seasonings, I’ve finally landed on this recipe and we can’t go a couple weeks without having it at least once.

Baked Salmon with Parmesan Asparagus

Serves 2

  • 1 lb salmon (preferably wild caught)
  • 1 bunch asparagus
  • 2 Tbsp olive oil
  • 2 tsp lemon juice
  • 1/4 cup freshly shredded Parmesan cheese
  • 1 tsp dill
  • Salt and Pepper
  1. Preheat oven to 400º F
  2. Line pan with aluminum foil
  3. Don’t worry about taking the skin off your salmon if you bought it with the skin on – it will stick to the aluminum when you serve the fish
  4. Place the salmon on the pan and drizzle with 1 Tbsp olive oil and the lemon juice.
  5. Sprinkle the dill over the salmon and place in the oven for 20 minutes (you don’t have to let the oven finish preheating – just put it in when you’re ready)
  6. As the salmon is about to finish baking, rinse the asparagus and cut off the ends, about 1″ from the end
  7. Take the salmon out of the oven (it won’t be done cooking yet) and place the asparagus on the pan so it’s not overlapping.
  8. Drizzle asparagus with remaining olive oil and season with salt and pepper.
  9. Sprinkle middles of stalks with parmesan cheese and return to the oven for 10 more minutes.
  10. Switch the oven to broil for an additional 2 minutes, then take out and ensure salmon is fully cooked (turns opaque and flakes easily).
  11. Serve immediately.

Baked Salmon and Parmesan Asparagus | Puppies in the Kitchen

Cooking times can differ depending on the thickness of the salmon. We usually buy a filet from the middle of the fish so it’s pretty thick but if yours is less than an inch thick, you may want to decrease the cooking time. Check that it’s mostly cooked before you add the asparagus to the pan. I’ve found this dish is kind of hard to mess up. The asparagus is fine to be cooked for another couple minutes if your salmon isn’t done when the time is up. You also can just take the asparagus off and set aside while the salmon finishes cooking. If you haven’t cooked salmon before, just play around with it. I’ve found it’s pretty flexible.

This recipe can also easily be adjusted for more or fewer people.

Enjoy :)